Introduction
FUPX
FUPX is a graphical interface for the UPX. It offers easy access to all documented and undocumented UPX parameters without the need for command line usage. The program works with the last four versions of the UPX: 3.91, 3.92, 3.93, 3.94, 3.95 (32 and 64-bit). The active UPX version can be set in the program options.
FUPX is a free software, and can be used both for personal and commercial use.
The author of the program FUPX is Jacek Pazera.
Program home page: https://www.pazera-software.com/products/free-upx
UPX (Ultimate Packer for eXecutables)
UPX is a free and open source executable packer supporting a number of file formats from different operating systems, including Portable Executable (PE) files (the most of EXE, DLL, OCX, CPL files used on Microsoft Windows systems), ELF executables (used on Unix, Linux, Solaris, FreeBSD and other operating systems), ARM executables and others.
After packing (compressing) executable file by the UPX, the resulting file remains executable and can be used in the same way as the original file. UPX uses a high efficient compression algorithms and achieves very good compression ratio, typically much better than WinZip/zip.
On Windows platform, UPX can pack 32 and 64 bit executable files produced according to Microsoft Portable Executable and COFF Specification (EXE, DLL, OCX, BPL, CPL, AX and other), but support for 64 bit files is currently declared as experimental. .NET executables are not supported.
The authors of the UPX are Markus F.X.J. Oberhumer, László Molnár & John F. Reiser.
UPX home page: https://upx.github.io/
Main window
After starting the program displays the main window:
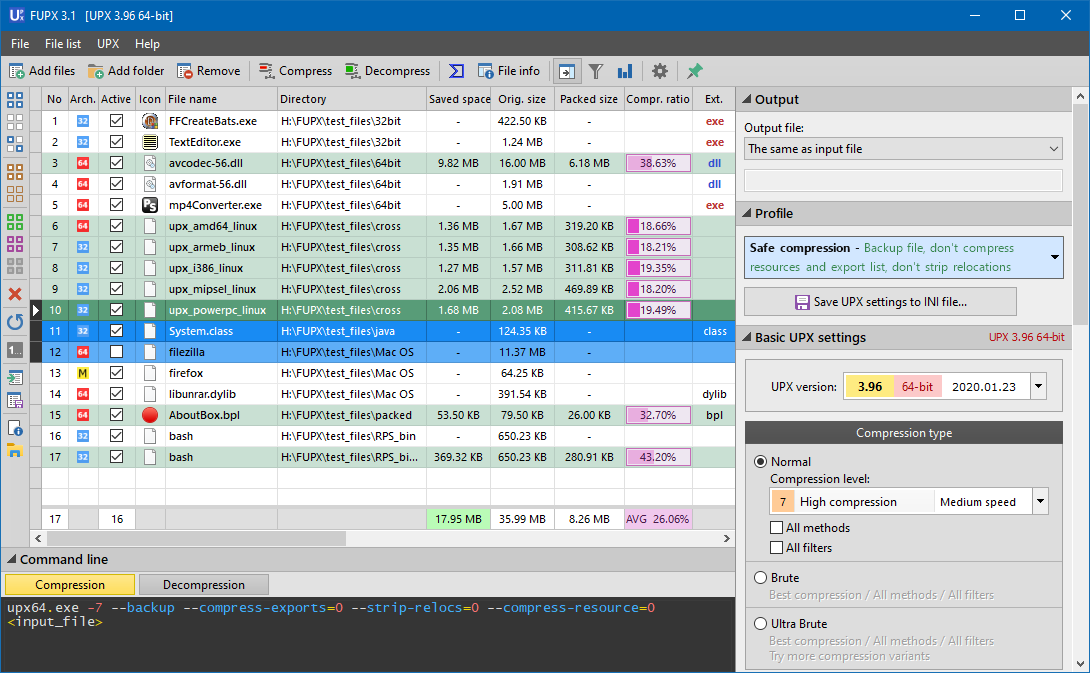
At the top of this window is the main menu, which gives you access to most functions of the application.
Below is a toolbar for easy access to frequently used operations.
The file list is located in the central part, it occupies a larger part of the interface.
In the lower part there is one expandable panel – Command line. Here you are displayed command line parameters that will be passed to the UPX compressor.
In the right part of the window there are several expandable panels:
- Output – Here you can specify the names of the output files obtained after compression / decompression.
- Profile – Here is a list with several predefined program settings – profiles. You can also create your own profiles.
- Basic UPX settings – In this panel you can set basic compression parameters, such as compression level, compression algorithm, excluding compression of specified resources etc.
- Additional UPX command line parameters – Here you can specify the list of switches that will be passed to the UPX compressor.
- Advanced UPX settings – For advanced users only. Here are the controls that allow you to change many advanced, mostly undocumented, UPX compressor options.
Compressing (packing) files
To pack executable files, you must first add them to the list. To do this, click the button in the toolbar. Will be displayed a standard dialog box for file selection, in which you have to select one or more executable files. You can also add files to the list using the drag and drop technique.
When you do this, the program analyzes the selected/dropped files and each executable file is added to the processing list, not executables (eg. text files without extension) are ignored. If the file is already compressed by UPX, it is marked on the list by green color. To start the compression, on the list must be at least one unpacked file, moreover, it must be checked in the Active column.
When you perform the above steps, click button on the toolbar. A new window appears, where you can track the compression process.
Decompressing (unpacking) files
First, you need to add to the list some executable files packed with UPX. Also make sure that the files you want to decompress are checked in the Active column. Then click button on the toolbar. A new window appears, where you can track the decompression process.
Compression parameters
If you ran the program for the first time and have not changed any compression parameters, will be used default UPX settings. You can change the compression parameters by selecting one of the predefined profiles (on the Profile panel), or by manually setting the desired parameters on the Basic UPX settings and Advanced UPX settings panels.
If you want to reset all UPX settings to default values, select menu → .
Managing file list
You can activate/deactivate any files in the list by checking/unchecking desired files in the column Active. Only the checked files will be processed during compression and decompression.
You can filter the files in the list based on multiple criteria. When the filter is enabled, all files excluded by the filter are hidden and will not be processed during compression, decompression and removing.
If you want to remove from the list some files, check them in the Active column and click button on the toolbar. All checked files will be removed from the list (but not from disk!). If you want to remove from the list all visible (not filtered) files, select menu → , then click the button.
You can change the location of files in the list using the drag and drop. Similarly, you can move the columns. If you want to show or hide some column, right-click on the file list header, and in the context menu, select or deselect the desired column.
You can sort (ascending or descending) the displayed information by clicking the appropriate column header.
Compress checked files (toolbar button )
Starts compression of the checked files in the list. Files hidden by the filter, unchecked files and already compressed files are ignored.
Decompress checked files (toolbar button )
Starts decompression of the checked files in the list. Files hidden by the filter, unchecked files and not compressed files are ignored.
Show window with the progress of the last operation
Displays the window with the compression / decompression progress. This window is automatically displayed when you start compression or decompression. If you close this window after completing the last operation (or it will be closed automatically), you can display it again by selecting this command.
Save BAT file (compression)
It allows you to save compression commands to a batch file.
Save BAT file (decompression)
Save the decompression commands to a batch file.
Options
Displays a window with the application settings.
Stay on top
When checked, the main window remains on top, even when it is not active. This allows you to easily drag and drop files from the Explorer.
Exit
Closes the application.
Add executable files to list (toolbar button )
Displays the system dialog box for file selection, in which you have to select one or more executable files, and click button. When you do this, the program analyzes the selected files and each executable file is added to the file list, not executables are ignored.
You can also add files to the list using the drag and drop technique.
Add executable files from folder (toolbar button )
Displays the system dialog box for folder selection, in which you have to select one folder, and click OK button. When you do this, the program will search all executable files in the selected folder and its subfolders. During the search is displayed another window, where you can track the progress of the operation and stop the search. If the selected folder contains a large number of files, the search may take some time. After the search, all executable files are then analyzed and added to the file list.
Remove checked files from list (toolbar button )
Removes checked files from the file list. Checked files hidden by the filter are not removed.
Renumber list
Assigns consecutive numbers to files on the list. This function can be useful after deleting some files, sorting or manually changing the order of files in the list.
Filter
Displays the Filter window, where you can specify filtering parameters.
Stats
Displays the Stats window, where you can see some statistical information: the number of packed and unpacked files, size of files before and after compression, saved disk space as a result of compression, the compression ratio, and a few others.
When calculating the statistics, program includes only the visible (not filtered out) and checked files in the column Active.
Check all files
Checks all files visible in the file list.
Uncheck all files
Unchecks all files visible in the file list.
Check packed files only
Checks all packed files and unchecks all not packed files. Only visible (not filtered) files are processed.
Check not packed files only
Checks all not packed files and unchecks all packed files. Only visible (not filtered) files are processed.
Invert selection (check state)
Changes check mark of all visible files to the opposite.
Check selected files
Checks the selected (highlighted) files on the list. This command is only active if at least one of the files on the list is selected (highlighted) but not checked.
Uncheck selected files
Removes the check mark from the selected (highlighted) files on the list. This command is only active if at least one of the files on the list is selected (highlighted) and checked.
Load file list
Enables to load the file list from the previously saved XML or LST file.
Save file listSaves the file list to XML or LST file.
In the LST files are only stored file names. When loading the file list from LST file, the program analyzes each file and if the file is executable, it is added to the list. It may take some time, but all displayed information will be up to date.
LST files are plain text files and can be edited in any text editor, eg. Notepad.
In the XML files are stored file names and all the additional information displayed on the list (size, compression ratio, file type, creation date, etc.). When loading data from XML file, the program does not make any analysis only reads all the information from the XML file. This process is very fast, but if after saving XML file you modified executable files on the disk, the data in the XML file may be outdated.
Open folder
Opens the folder that contains the selected file.
File properties
Shows the properties of the selected file.
Loading & saving settings
When you close the program, all compression settings are saved to the file __Last.ini in the profiles directory. The next time you run application, compression settings are loaded from this file.
The rest of the application settings (main window size and location, columns order and visibility, current color scheme and many others) are stored in the file fupx.ini in the program main directory. Of course, these settings are also loaded at the next startup.
Portability
The program does not use system registry and all settings are stored in the above-mentioned files. If you want, you can copy all files (including whole directory structure) to the USB drive, and run the program from that drive on other computers.
You can also download the program in the form of a ZIP archive and extract it to an external drive.